
 Slide
Projection Systems
| Planet Ops | General
Information | Informational |
Panorama | Wide |
Special | Slew | All-Sky
|
General
Information
- All of the auxiliary slide projection systems (not counting
special effects) use Kodak carousel Ektagraphic III-E slide
projectors.
- Many of the 21 auxiliary slide projectors are located in the
Projection Booth. Most projectors are mounted in Chief projection
racks to facilitate stacking, stability, and alignment
control.
- One additional projector is located in the Planetarium
workroom to facilitate slide sorting.
- DO NOT MOVE ANY PROJECTOR! Projectors have been carefully and
tediously aligned. If moved, to realign them may easily require a
full day's work (or more) by two people.
- Projectors are named after the location of the projection
field, rather than the location of the projector. For example,
the right panorama is located on the left side of the Projection
Booth. It is called "right" because it projects straight across
the dome onto the right side of the dome, as viewed by an
east-facing audience. In other words, the viewer's frame of
reference is privileged, not ours!
- Panorama and Informational projectors (see below) are
double-stacked in Chief racks to provide "dissolve-pairs," that
is, the ability to dissolve between identically-aligned images.
The top projector of any dissolve-pair is referred to as A, and
the bottom member of any dissolve-pair is B.
- Slide projectors are connected to Castor control units to
facilitate automation. Four Castors are controlled by one Gemini
unit, which relays the signals passed to it from the Hercules
computer located at the console. For automation purposes, each
Gemini is assigned a "unit" number, and each Castor plugged into a
Gemini is assigned a "slot" number (increasing from 1 to 4 as the
plugs on the Gemini's rear panel move outward).
- Every projector should have its switch in the FAN position,
rather than set to OFF, HI, or LOW.
- Slide trays hold 80 Wess-mounted slides. For convenience in
checking projector alignment, most carousel trays have a
horizontal grid slide in slot #80, and a vertical grid slide in
slot #79.
- Every carousel tray has a contents list on the computer, which
should be updated any time changes are made. Slides for several
shows can be kept in many trays at the same time, but do not
rearrange any slides casually. If any slides are rearranged or
assigned to new positions in the tray, the automation files for
the show using those slides must be updated.
- Add slides to carousel trays with the images upside down, with
the correct (i.e., readable) side facing the lamp. Wess mountings
should consistently show along the top of the tray either the
serrated finger-openings (horizontal image) or the circular notch
(vertical image).
- Spare lamps are kept in the projection booth. If a lamp burns
out during a show, manually turn off the projector and replace the
lamp. After the projector is turned back on again, the automation
system will automatically advance the projector to the slide where
it should be at that time.
Informational
Projectors
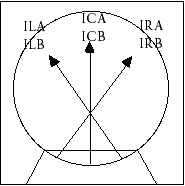
- The informational system consists of three slide projector
dissolve-pairs, designated as left, center and right. This system
supplies the bulk of the visual material making up a typical
planetarium presentation.
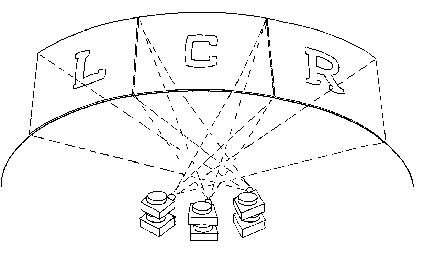
- The informational projection system spans approximately 120
degrees of the dome azimuth, centered at the focus of the audience
viewing area. The vertical center of these projections lies midway
up the dome, to provide comfortable and unobstructed viewing for
the audience.
- These program projectors can also be used by science faculty
for ordinary slide shows in the planetarium theater on any subject
(even without the star projector).
- Informational Focal Length: 4 in.
|
Code
|
Description
|
Type
|
Unit
|
Slot
|
PP
|
|
|
IRA
|
Informational Right A
|
SP
|
3
|
1
|
22
|
|
IRB
|
Informational Right B
|
SP
|
3
|
2
|
22
|
|
ICA
|
Informational Center A
|
SP
|
4
|
1
|
21
|
|
ICB
|
Informational Center B
|
SP
|
4
|
2
|
21
|
|
ILA
|
Informational Left A
|
SP
|
5
|
1
|
27
|
|
ILB
|
Informational Left B
|
SP
|
5
|
2
|
27
|
|
INFA
|
Informational Group A
|
GP
|
NA
|
NA
|
NA
|
|
INFB
|
Informational Group B
|
GP
|
NA
|
NA
|
NA
|
Panorama
Projectors
- Panoramas often are used to project a low, wide image of an
edge (or chord) of a planet below, as it might appear from orbit.
Panoramas also provide a basis for complementary video special
effects, such as a moving space shuttle or telescope shown above
an Earth panorama, or a video of a solar flare projected above a
Sun panorama.
- We will often use pans to show constellation figures as the
constellation rises in the east.
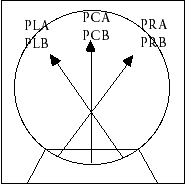
- The panorama projection system spans approximately 180 degrees
of the dome horizon, centered at the focus of the audience viewing
area. Each panorama consists of three panels, overlapping 25% to
conform to multi-image industry standards.
- Each panel consists of projector dissolve pairs, providing
panorama crossfade capability.
- Each projector can be individually controlled, allowing any
projector in the pan system to stand alone and present individual
images.
- Panorama Focal Length: 2 in.
|
Code
|
Description
|
Type
|
Unit
|
Slot
|
PP
|
|
|
PRA
|
Panorama Right A
|
SP
|
3
|
3
|
22
|
|
PRB
|
Panorama Right B
|
SP
|
3
|
4
|
22
|
|
PCA
|
Panorama Center A
|
SP
|
4
|
3
|
21
|
|
PCB
|
Panorama Center B
|
SP
|
4
|
4
|
21
|
|
PLA
|
Panorama Left A
|
SP
|
5
|
3
|
27
|
|
PLB
|
Panorama Left B
|
SP
|
5
|
4
|
27
|
|
APAN
|
Panorama Group A
|
GP
|
NA
|
NA
|
NA
|
|
BPAN
|
Panorama Group B
|
GP
|
NA
|
NA
|
NA
|
To Pan or Not to Pan? Info's vs. Pan
Projectors
Since Pans give a bigger field of view, why use Informationals at
all?
- Horizontal vs. Vertical
Pans show only horizontal images (vertical images will drop below
the dome and show on the wall, and may be cut off overhead). If a
series of related slides includes any vertical images, the entire
series must be put in Informational projectors.
- Resolution and Brightness
As a general rule, pan images are projected at a rather dim
intensity (e.g., about 20 or 30%). The lateral pan images (left
and right) are reflected through mirrors, which makes them more
difficult to keep in a clear, precise focus. Generally, due to the
curvature of the dome, only the lower third of a horizontal pan
image will be in focus anyway (despite our special lenses, which
compensate for the curvature to some degree). The bottom line is
that if a series of related slides includes any that require
bright illumination or that depict details necessitating a clear
and precise focus, then put the entire series in Informational
projectors rather than pans.
- Dissolve Pairs vs. Dissolve Triplets
All other things being equal, the Informational projectors are
better suited for dissolve pairs, since they are aligned together.
In contrast, the Pan fields of view are aligned in groups of
three, abutting, rather than aligned with their corresponding
field of view. In other words, PCA is aligned with PLA and PRA
rather than with PCB. If there is a sequence of slides that
includes one or more dissolve pairs, put them all in
Informationals unless there is some reason why they must be in
pans. Conversely, when switching between panorama scenes, it is
usually best to fade through black (unless the scenes are quite
similar).
- Visibility
Informationals are easily visible to all seats, whereas Pans are
only partially visible. With a pan, the only thing that matters is
that much of it is visible from any given seat. All other things
being equal, if it is crucial that everyone see the entire image,
put it in an Informational rather than a Pan.
Wide Angle
Projectors
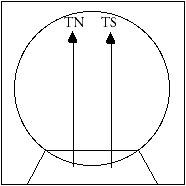
- The wide angle projection system span a large vertical portion
of the dome, almost 90 degrees from the springline to the zenith,
centered at the focus of the audience viewing area.
- The projected images of this two-field system includes most
viewer's peripheral vision, effectively enveloping the participant
with a single visual.
- Sample use: Any towering image, such as tall forest trees in
conjunction with snow special effect projectors above a panorama
of a winter scene.
- Wide Angle Focal Length: 1.4 in.
|
Code
|
Description
|
Type
|
Unit
|
Slot
|
PP
|
|
|
TN
|
Top North
|
SP
|
6
|
1
|
16
|
|
TS
|
Top South
|
SP
|
6
|
1
|
16
|
|
TG
|
Top Group
|
GP
|
NA
|
NA
|
NA
|
Special
Projectors
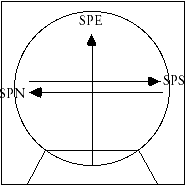
- Three 'special' projectors are included to help fill out the
viewing area and add interest to the scene. These projectors are
singles, not dissolve pairs.
- Typically, 'specials' are oriented outside the normal field of
view, and are used to provide orientation hints to the audience
and direct their attention to objects of interest outside of their
normal forward-looking cone of view.
- Special Focal Length: 3 in.
|
Code
|
Description
|
Type
|
Unit
|
Slot
|
PP
|
|
|
SPE
|
Special East
|
SP
|
6
|
3
|
21
|
|
SPN
|
Special North
|
SP
|
1
|
1
|
15
|
|
SPS
|
Special South
|
SP
|
2
|
1
|
3
|
|
SPG
|
Special Group
|
GP
|
NA
|
NA
|
NA
|
Slew Zoom Rotator
Projection
- Phase II: Not yet installed at OBU.
- A slew-zoom-rotator projector adds motion to the images in the
environment. The range of motion allows the producer to place
images in unexpected parts of the dome and move them through a
travel that far exceeds the dimensions of a video image.
- This special purpose projector is very versatile, combining
the functionality of many separate devices into one combined
package. A device such as this is instrumental in adding interest
and preventing a presentation from becoming sterile.
All-Sky
System
- Not possible in a small planetarium without an elevator for
the star projector.
- 6 slide projectors with wide-angle lenses (like our Top North
and Top South projectors), located around the circumference of the
gallery at 60 degrees intervals, mounted in 6 rigid, anchored
projection racks.
- Each projector location is assigned a number from 1 to 6,
beginning with due south.
- This "all-sky" set of slide projectors fills the entire dome
with a composite image; e.g., the cockpit of a spaceship, a
full-view of a galaxy or nebula, or a map of constellations and
other celestial objects superimposed upon the starfield. In
addition to its routine use in planetarium shows, dissolving from
one all-sky image to another can effectively demonstrate many
concepts in general science.
- Through whole-dome ("all-sky") projection, students might
explore the scales of magnitude of powers of ten, dissolving up
from quarks to atoms to people to stars to galaxies to galactic
strings and back down again.
- A series of whole-dome images could be used to present a
guided tour of the biochemistry and large structures of a cell, as
seen from the inside.
- Look up from the center of a volcano (using a whole-dome
projection image), then tour volcanoes and volcanic phenomena
throughout the solar system. Or, similarly, tour the
meteorological phenomena of various planetary bodies, including
Earth.
| Top |
©1997