
 Storyboarding
| Slides |
Why?
A typical show may use a hundred different scenes or combinations
of visuals. These need to be carefully planned in advance, before
trying to automate the show with Hercules.
When?
Storyboarding can be done while slides are being produced and
mounted, and should be completed before they are loaded into carousel
trays and taken into the planetarium for automation. The writing and
recording of the show script must also be finished before
storyboarding is completed. Oftentimes the scripting of the show may
be dialectically related to its storyboarding, and the show can be
storyboarded (at least in a preliminary form) as it is being
written.
What?
Storyboarding is a way of sequentially laying out in pictorial
form everything that happens during each successive moment of a show.
Imagine that every visual has its own notecard, and that you want to
lay out the notecards in the order in which they are used. The
“bulletin board” you arrange the notecards on is the
“storyboard.” Notecards for visuals that appear together
are grouped together in the layout.
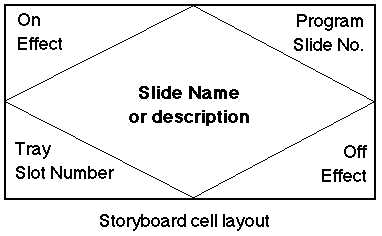
Here is a template for a single notecard or storyboard cell:
|
Function
|
Example
|
Explanation
|
|
Slide Name
|
Corral
|
Concise, self-explanatory label
|
|
Program slide number
|
100
|
Corresponds to program slide list
|
|
Tray Slot number
|
1-79
|
Indicates where the slide is found in the carousel tray.
Essential reference for automation programming of "Find
Slide" commands.
|
|
On Effect
|
4N
|
Suggested automation command.
|
|
Off Effect
|
4F
|
Suggested automation command.
|
HINTS:
- Fill in notecard information in the order listed.
- Use a pencil, and keep a large eraser handy!
Putting it all together
- Careful planning is not a delay, but a shortcut! If done
carefully, when the storyboarding is complete the show is almost
ready, even if none of the slides have yet appeared on the
planetarium dome!
- Arrange storyboard sheets on a portable bulletin board so that
a full view of the layout is possible. Secure them with
thumbtacks. and carry it to work in the Production Room or
Planetarium as needed.
- Each cell of a storyboard table represents a
notecard as described above. As you fill it out, pencil in the
diagonal lines as needed.
- Each column represents a particular
projector, and indicates when and how it participates in the show.
The Configuration List indicates the various abbreviations.
- Each row represents a moment in time, or a
time period of short duration during which only one set of visuals
appears. When working in the automation system, each row will
correspond to a single "cue block."
- SMPTE: The far left column of the storyboard tracks timecode
for the length of the show.
Note: An estimated value should be available from the left column
of the prerecorded show script. The middle column of the show
script is in effect a storyboard simplified into one column to
work from, and should be updated when the master storyboarding is
complete.
- Many visuals are visible for more than one row at a time:
- For each row during which time a visual is visible, pencil
in its name in the corresponding column.
- For the first cell that indicates when a visual
begins to come on, fill in the three corner
information spaces (On Effect, Program Number, Tray
Number).
- For the last cell that indicates when a visual
begins to go off, fill in the lower right
corner information space only (Off Effect).
- To facilitate automation of wait sequences, precede the On
or Off effect with a W and the number of seconds to be waited.
Example: use W2N3 to indicate a fade on in 3 secs beginning 2
secs after the time code indicated in the time code column. Or
use W7F3 in the lower right corner to indicate a fade off in 3
secs, beginning 7 secs after the time code indicated in the
time code column (which is the same as beginning the fade off
at 2 secs after the image is fully on, if the W2N3 instruction
was used).
- Time Up
- No single combination of visuals should be projected for
more than ten seconds. (When pans are up for more than 10
seconds then other things will be happening, with projector
motion or the pointer, etc.)
- When scripting the automation file, adjust timings so that
visuals appear just before the narration describes them.
- A slide with words that are meant to be read by the
audience should be up as long as it takes to read it out loud
three times--and no longer.
- Dissolve pairs: Storyboarding notes
- Panorama and Informational projectors come in A and B
dissolve-pairs. Dissolve sequences may involve simply a
transition between 2 slides, or the creation of motion effects
with multiple slides projecting from alternating dissolve-pair
projectors.
- Remember that if you want to dissolve between two sets of
visuals, then the two sets of visuals must be in different
trays so that A may dissolve into B or vice versa.
- To decide in which trays to put a given panorama requires
study of the entire show script to ensure that all dissolves
will move between alternate projectors.
- When possible, prefer Pan B projectors for tall pans and
Pan A projectors for low scenes. The top half of images
projected from the central pan A projector (PCA) are cut off by
the projection booth, but this is not the case with PCB.
- To facilitate automation scripting, identify dissolve pairs
by preceding the On or Off effect with a D. Thus DN4 or DF4
indicates a dissolve sequence rather than a simple fade. If you
encounter a DF when programming the automation file, you will
know to look on the following row, in the column for the
complementary A or B projector, for a DN notation.
- Dissolve pairs: Show considerations
- Dissolve transitions are easier on the eyes than rapid
fading through black, and provide a visual reinforcement of a
transition in the show. They should be timed to occur
simultaneously with musical or other soundtrack
transitions.
- See the Wess catalogs for interesting dissolve-sequence
effects with masks. There are some extraordinary opportunities
for creative choreography here.
- Dissolved images must maintain continuity of style and
consistency of orientation. Not just any dissolve-combination
will work. Don't dissolve between vertical and horizontal
images, between dark and light backgrounds, between word-slides
and art-slides, between viewing angles, etc. Strive to preserve
continuity in all dissolve-effects. Note: Dissolve sequences
require more precise image alignment, perhaps variable
registration mounting.
- Word slides: Production hints
- For recorded shows, it is useful to include dated
information (such as a list of the visible planets) on a word
slide that may be easily replaced without making it necessary
to edit the soundtrack.
- Word slides may be prepared with PowerPoint presentation
software, and then photographed from the computer monitor with
a long exposure time.
- Preserve graphic and stylistic continuity. PowerPoint
background templates facilitate this.
- When preparing word slides, use no more than nine
50-character lines. Characters should be large enough to be
legible on the monitor from a distance of 12 feet.
- Avoid ornate fonts. Maintain font continuity.
- Mixed case letters are easier to read than all
lowercase.
- Prefer black or dark backgrounds. Avoid pastels.
- Avoid grey rectangles by using masks and square or circular
mounts whenever possible.
| Top |
©1997